> ## Documentation Index
> Fetch the complete documentation index at: https://docs.anygen.io/llms.txt
> Use this file to discover all available pages before exploring further.
# AnyGen CLI — Run Tasks on Your Own Machine
# How it works
By default, the Agent runs tasks in a cloud sandbox. That's the right place for reaching the public internet, doing research, writing code, and working with files you upload — but it can't touch your corporate intranet, your local files, or the tools and accounts already set up on your own machine.
AnyGen CLI installs on an office computer, an intranet server, or an operations host. Anything that machine can reach, the Agent can reach through the CLI: running commands, reading and writing files, and accessing intranet resources. Planning and reasoning still happen in the cloud; the actual work happens on the target machine. Intranet data never has to leave the network, and you don't need to open any inbound ports.
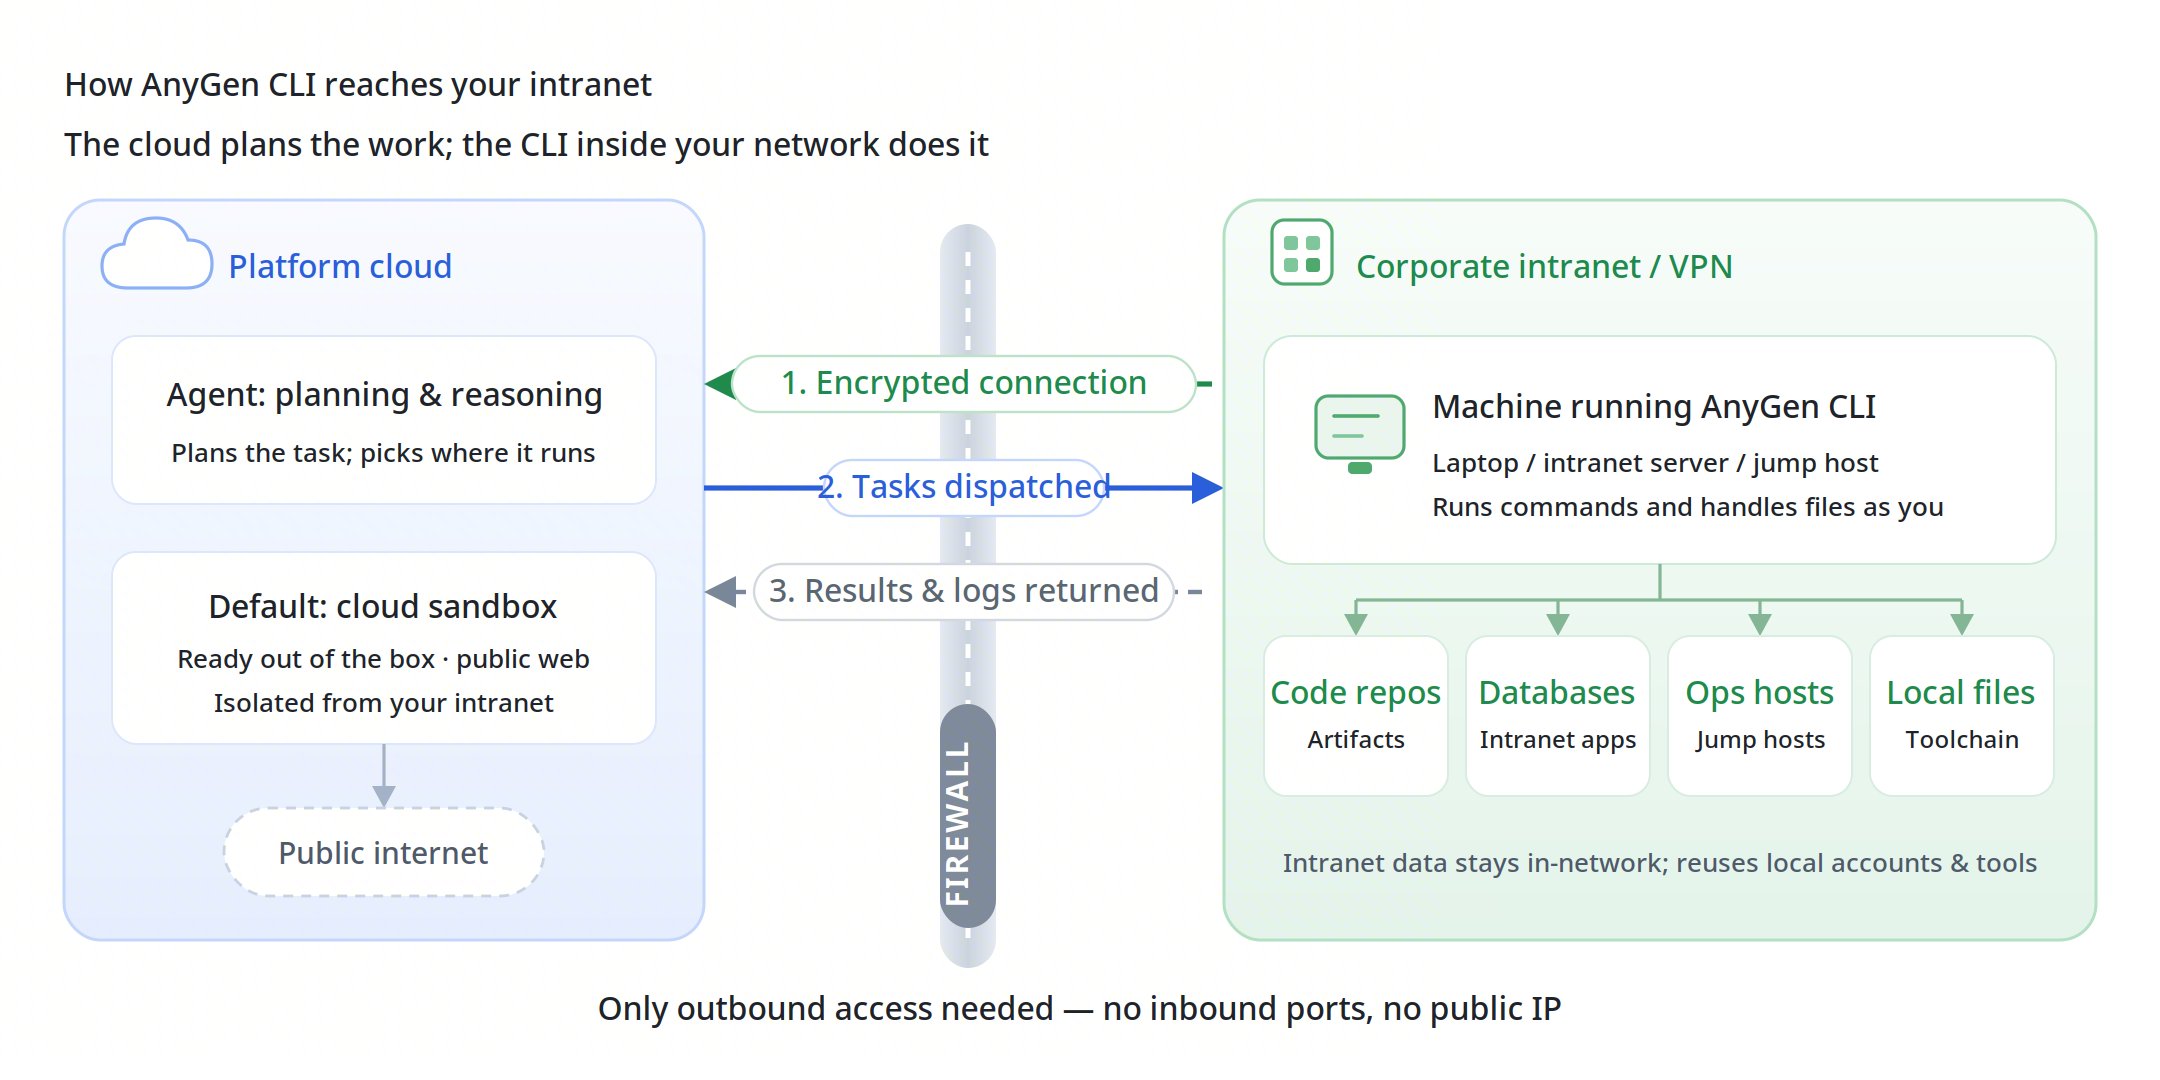 **How the two execution environments divide the work.**
| **Item** | **Cloud sandbox** | **AnyGen CLI** |
| :---------------- | :-------------------------------------------------------- | :------------------------------------------------------------------------------------------------------------- |
| **Runs on** | The cloud | The machine where you installed the CLI |
| **Reaches** | Public internet | Anything that machine can reach, including the corporate intranet and VPN |
| **Can use** | Temporary files inside the sandbox and content you upload | Local files, intranet systems, and the tools and accounts already configured on the machine |
| **Best for** | Research, general coding, processing uploads | Intranet systems and databases, development in real project directories, remote operations and troubleshooting |
| **Prerequisites** | Works out of the box | Install the CLI on the target machine and keep its persistent connection online — see Quick Start below |
# Quick Start
**Desktop Client (CLI built in)**
```text theme={null}
https://www.anygen.io/download
```
Download the Desktop Client for Mac or Windows from the official site. The CLI is bundled with it and ready to use as soon as you sign in — no separate installation required. If you only need the CLI itself, install it directly using the steps below.
**Linux and macOS**
```shell theme={null}
# 1. Download / update
curl -fsSL https://www.anygen.io/client/install.sh | bash
# 2. Sign in — a browser page opens; click Approve
anygen auth login
# 3. Make the anygen command available globally
source ~/.bashrc
```
**Windows**
```powershell theme={null}
irm https://www.anygen.io/client/install.ps1 | iex
```
# Common Commands
| **Command** | **What it does** |
| :----------------------------- | :----------------------------------- |
| `anygen status` | Check service status and recent logs |
| `anygen start` / `anygen stop` | Start / stop the service |
| `anygen uninstall` | Uninstall the service |
# Usage
Simply ask the agent which devices are available, then tell it in the conversation which device should run the task.
# Managing Multiple Devices
Once the CLI is installed, tasks can land on three kinds of environments: the **public sandbox**, **shared internal devices**, and **your own private devices**. The first two are open to everyone by default; only the owner can use a private device.
**How the two execution environments divide the work.**
| **Item** | **Cloud sandbox** | **AnyGen CLI** |
| :---------------- | :-------------------------------------------------------- | :------------------------------------------------------------------------------------------------------------- |
| **Runs on** | The cloud | The machine where you installed the CLI |
| **Reaches** | Public internet | Anything that machine can reach, including the corporate intranet and VPN |
| **Can use** | Temporary files inside the sandbox and content you upload | Local files, intranet systems, and the tools and accounts already configured on the machine |
| **Best for** | Research, general coding, processing uploads | Intranet systems and databases, development in real project directories, remote operations and troubleshooting |
| **Prerequisites** | Works out of the box | Install the CLI on the target machine and keep its persistent connection online — see Quick Start below |
# Quick Start
**Desktop Client (CLI built in)**
```text theme={null}
https://www.anygen.io/download
```
Download the Desktop Client for Mac or Windows from the official site. The CLI is bundled with it and ready to use as soon as you sign in — no separate installation required. If you only need the CLI itself, install it directly using the steps below.
**Linux and macOS**
```shell theme={null}
# 1. Download / update
curl -fsSL https://www.anygen.io/client/install.sh | bash
# 2. Sign in — a browser page opens; click Approve
anygen auth login
# 3. Make the anygen command available globally
source ~/.bashrc
```
**Windows**
```powershell theme={null}
irm https://www.anygen.io/client/install.ps1 | iex
```
# Common Commands
| **Command** | **What it does** |
| :----------------------------- | :----------------------------------- |
| `anygen status` | Check service status and recent logs |
| `anygen start` / `anygen stop` | Start / stop the service |
| `anygen uninstall` | Uninstall the service |
# Usage
Simply ask the agent which devices are available, then tell it in the conversation which device should run the task.
# Managing Multiple Devices
Once the CLI is installed, tasks can land on three kinds of environments: the **public sandbox**, **shared internal devices**, and **your own private devices**. The first two are open to everyone by default; only the owner can use a private device.
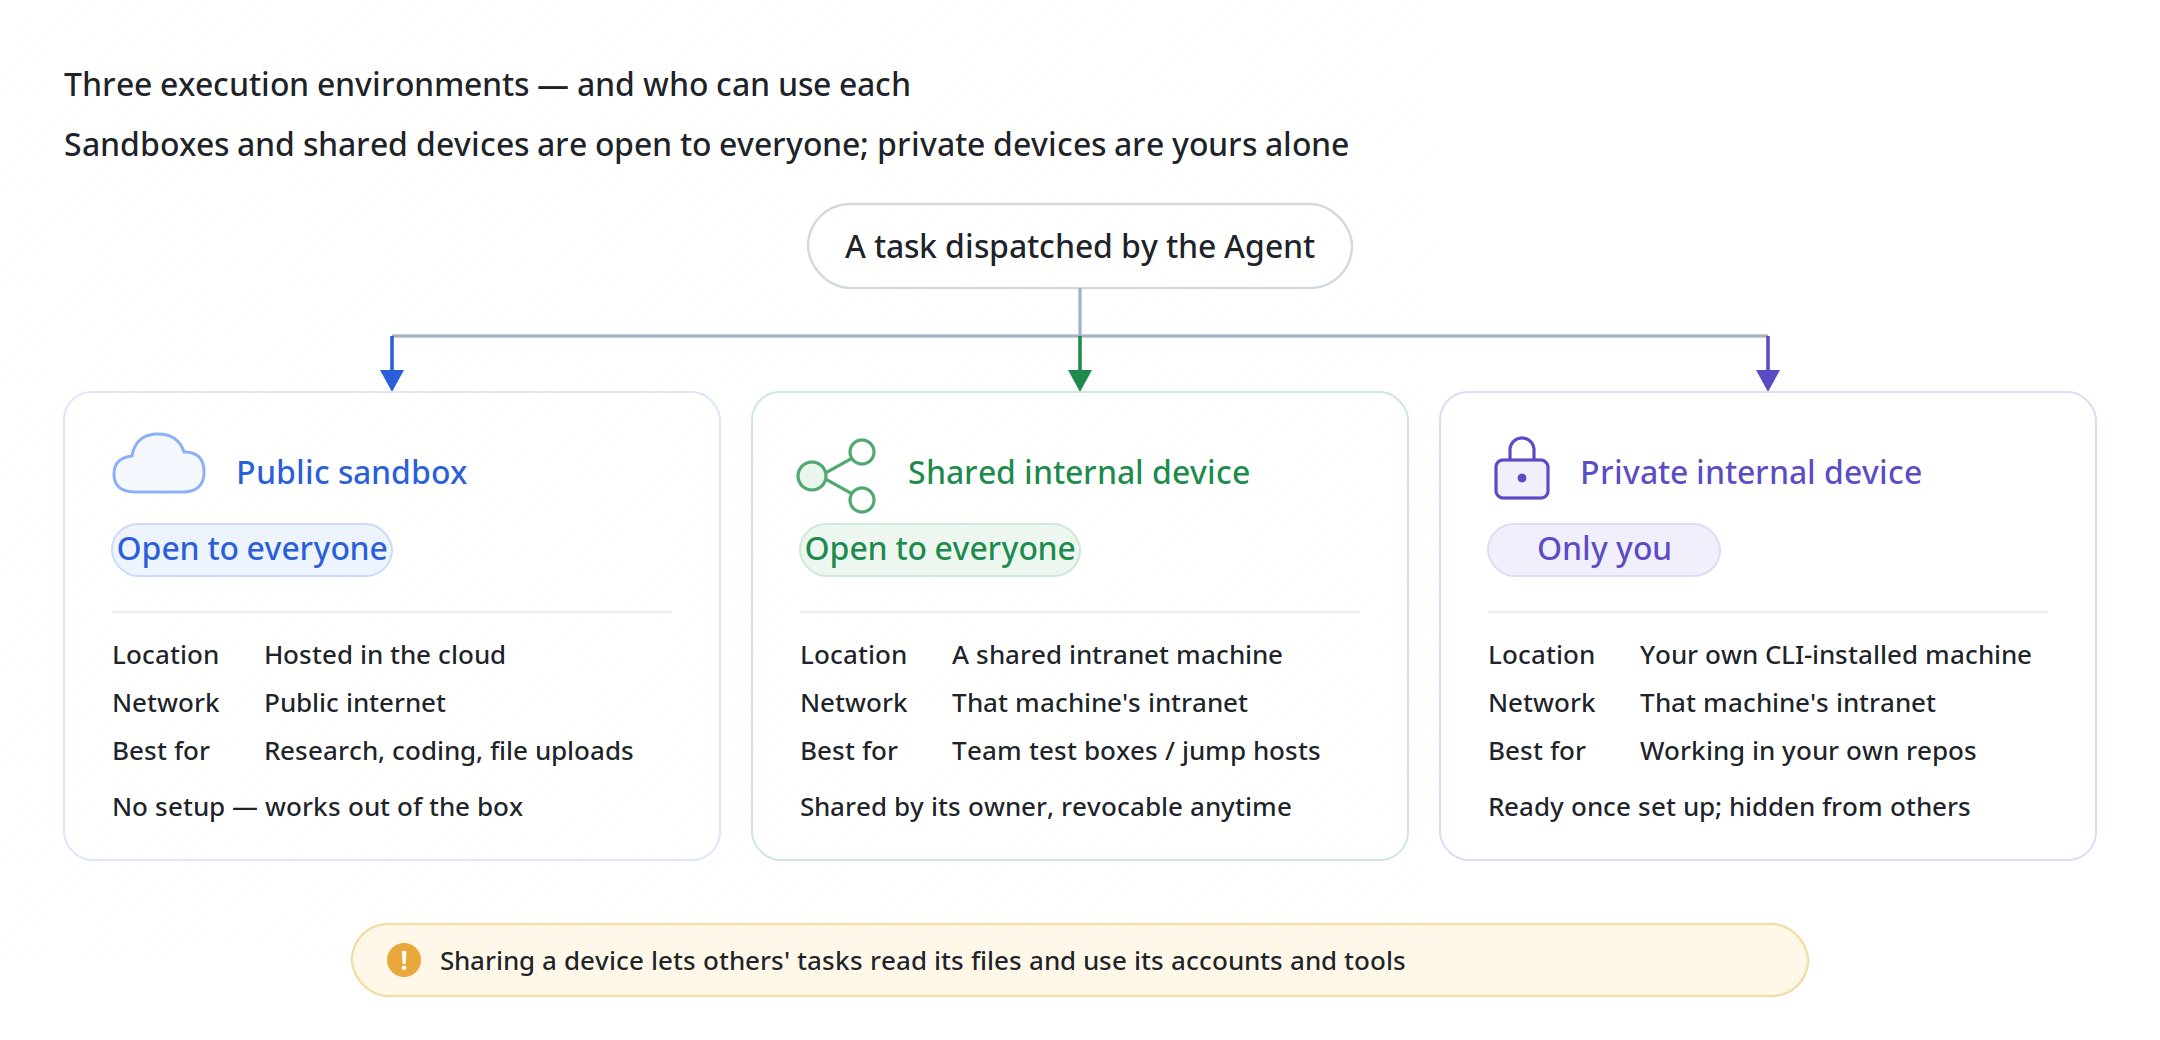 * **Public sandbox.** Hosted by the platform — nothing to install. It reaches the public internet but not your corporate intranet. When you don't specify a device, tasks run here by default.
* **Shared internal devices.** When the owner of an intranet machine shares it, anyone can send tasks to run on it. This fits a team test machine or a jump host with specific intranet permissions — no need for every person to set up their own. Sharing is initiated by the device owner and can be revoked at any time.
* **Your own private device.** The machine where you installed the CLI following the steps above is yours alone by default: nobody else can see it or use it. Pick this when you need to work in your own project directories or reach systems only you have access to.
**Set the boundary before you share.** Sharing a device means letting other people's tasks run on it — reading and writing its files and using the accounts and tools already configured there. Only share with people you trust, and never share a machine that holds sensitive data or high-privilege credentials.
# FAQ
**Q1: My device keeps going offline.**
Linger may not be enabled, which causes the connection to drop once your SSH session exits.
Recommended: while the device is online, ask the agent to check and fix it for you.
To fix it manually, run:
```text theme={null}
loginctl enable-linger
```
* **Public sandbox.** Hosted by the platform — nothing to install. It reaches the public internet but not your corporate intranet. When you don't specify a device, tasks run here by default.
* **Shared internal devices.** When the owner of an intranet machine shares it, anyone can send tasks to run on it. This fits a team test machine or a jump host with specific intranet permissions — no need for every person to set up their own. Sharing is initiated by the device owner and can be revoked at any time.
* **Your own private device.** The machine where you installed the CLI following the steps above is yours alone by default: nobody else can see it or use it. Pick this when you need to work in your own project directories or reach systems only you have access to.
**Set the boundary before you share.** Sharing a device means letting other people's tasks run on it — reading and writing its files and using the accounts and tools already configured there. Only share with people you trust, and never share a machine that holds sensitive data or high-privilege credentials.
# FAQ
**Q1: My device keeps going offline.**
Linger may not be enabled, which causes the connection to drop once your SSH session exits.
Recommended: while the device is online, ask the agent to check and fix it for you.
To fix it manually, run:
```text theme={null}
loginctl enable-linger
```